100% disk usage can slow your system down. Even when no apps are open and all the other hardware is at comfortable levels, you can still get long-term 100% disk usage, which can also affect gaming in a significant way. Today, we’re going to try and solve that problem.
Before we move on, some quick notes:
- Disk usage is a metric of how much of the disk’s speed is being used up. Each disk comes with its own read and write speeds. HDDs have lower speeds than SATA SSDs, and M.2 NVMe SSDs have the highest speeds. Let’s say a disk has a speed of 3000 MB/s. If your apps and processes are using a major chunk of this speed, it will show up as 100% disk usage. As processes release disk use, others that were previously throttled will take up the freed-up resource, keeping your disk usage persistently 100%.
- An older PC or laptop with an HDD can be hitting 100% disk usage for obvious reasons – it’s being used up completely because the software (mainly the operating system files) has updated, but the hardware isn’t fast enough or powerful enough for all this. In this case, the likelihood of fixing the issue using the steps below decreases considerably. Still, you can try these solutions without any safety concerns.
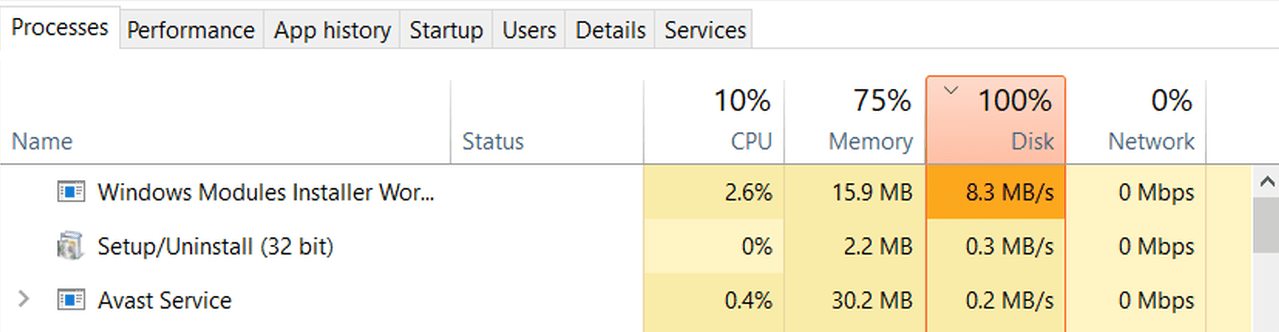
- The situation needs to be permanent and not temporary to be an actual problem. If you get 100% disk usage in bursts where everything slows down, and you get back to low disk usage, it’s most likely because the system, services, and background applications are surging their disk usage. This mainly happens during updates and driver installations. Make sure all updates are finished on the PC. If items like “Windows Modules Installer” (featured image of this article) or “Service Host: Device Install Service” are taking up the disk, then it’s fine. Just wait for them to finish. If updates are not finishing at all and you’re stuck in an update loop, that’s a different problem altogether.
Common Fixes
Now, if you have a fairly modern disk (and particularly an SSD) and the problem is permanent or at least long-term, here’s how to troubleshoot and fix 100% disk usage on your Windows PC.
Update SSD Firmware
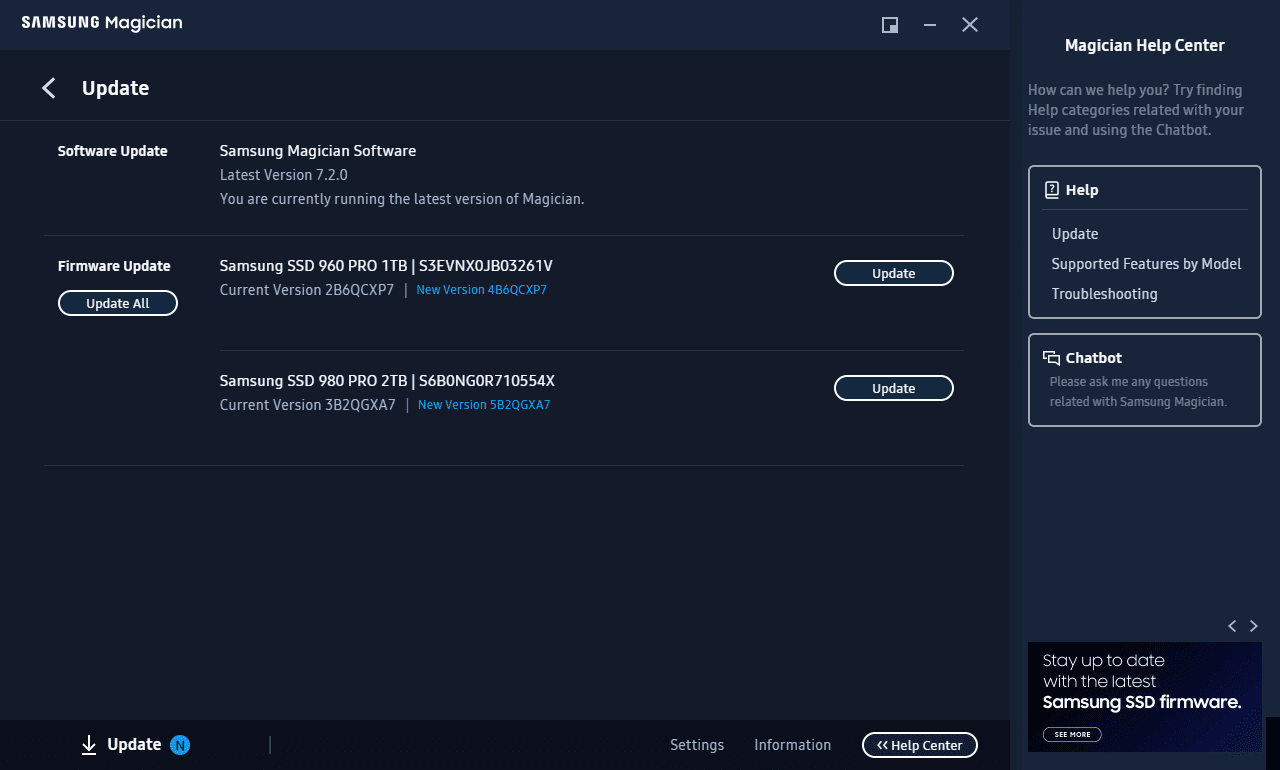
All manufacturers and OEMs have a tool that allows you to update the firmware version of your SSD. This is kind of like updating your BIOS version and is not a driver update. If you don’t know the exact model of your SSD, you can find it out by opening My PC, right-clicking the SSD drive, choosing Properties, and going to the Hardware tab.
You will find the exact name of the SSD here. After that, all you need to do is perform a Google search for the most relevant firmware update tool. You will need to download such a tool and check for a firmware update. If there’s an update available, do it and it should probably fix the problem once you restart the PC.
A more complete guide can be found on XDA Developers.
New updates or different software don’t have perfect optimization for all SSDs under the sun. These are often patched and sometimes, the SSD manufacturer needs to patch some issues with their SSD on their end. A firmware update ensures this happens in a timely manner.
Check Resource Monitor
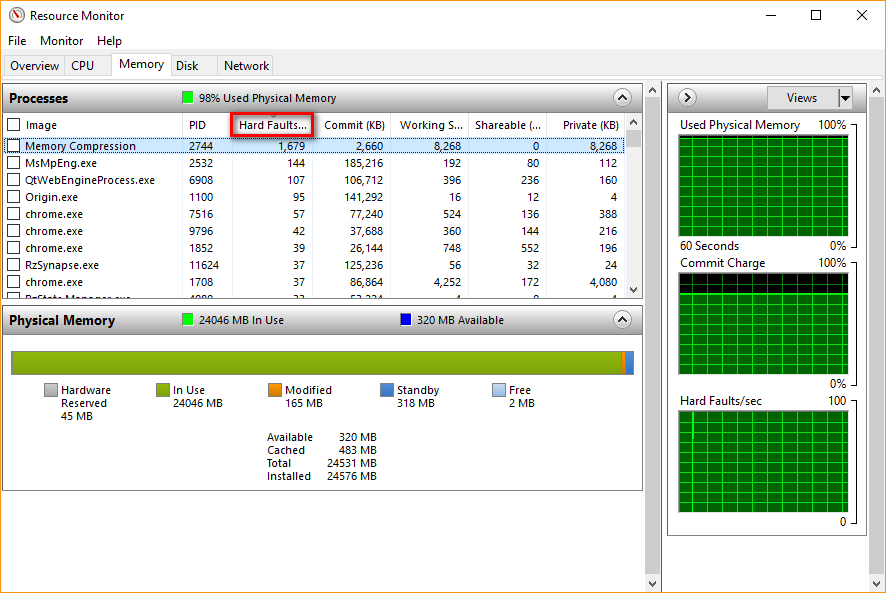
Open Resource Monitor by searching for it in Start. Go to the Memory tab and check the column for “Hard Faults.” Ideally, it should be all zeroes. A few don’t hurt. But if you have a high number of hard faults, it means that that app or those apps are the culprit.
Hard faults in RAM mean your PC thinks that your RAM is full. Just like any operating system with common sense, Windows tries to compensate for it by using the disk space for the RAM’s work. If your RAM is actually full, then this is normal behavior. So, make sure your disk and RAM usage are not both 90%+. However, hard faults can trigger high disk usage without the RAM being full, sending your disk usage to 100%.
The actual app in question is the problem here, and you can try to fix this issue by troubleshooting RAM hard fault issues on that particular app.
Background Apps & Services
I’m sure you’ve heard this a million times. Background apps use disk space and RAM, eating up resources while you need them for gaming or something else, making the system slower or the gaming experience laggy. Well, here’s a quick checklist to go through, just in case:
- Open the Task Manager and go to the Startup tab. Here, deselect all programs that you don’t absolutely need. Windows services like Security and Explorer as well as audio drivers, graphics drivers, etc. can be kept on.
- Open Services (Ctrl + R > type services.msc > press Enter). Here, sort the whole list by the Startup Type column and all the services that launch by themselves on startup will be listed at the top (“Automatic”). Except for Windows services, you can set the others to “Manual” or “Automatic (Delayed Start)” to not have them open on their own.
After doing either of these, restart the system to see the disk usage now.
Check Read/Write Speeds
There is a small chance that electrical damage of some kind has caused a problem in your disk. Also, you could have a fake or faulty SSD to begin with. Basically, there could be a few reasons why your disk’s speed is lower than expected, and as a result, it’s getting full.
First of all, check the read/write speed specs of your disk on the official site. To find the name of the disk, go to Device Manager or just right-click the volume in My PC > Properties > Hardware. Then, Google this exact name and try to find the official specs.
Note this down. Download and install a program called HWiNFO and close all other programs. Start the test to benchmark your disk. Now, compare the results. If you are getting tremendously lower read/write speeds even after multiple tests, it’s a faulty disk and will most likely need to be looked at by a professional or replaced altogether.
Clearing Temporary Files
There are three folders that you can clean up. These folders keep temporary files from programs. Deleting these files is generally safe. Also, the files currently being used cannot be deleted, you just skip them. Still, take care and make sure that no apps are open when you do this step.
Press Ctrl + R to open Run and type %temp% into the dialog box, then press Enter. It will open a folder. Select all files and delete them. Repeat the step for the temp folder and the prefetch folder as well (might require administrator access). The %temp% and temp folders are different.
Fixing Disks
Windows has some built-in tools to help you check and potentially fix the health of your drive. If you’re using a fairly new SSD, have double-checked that it’s not a fake (has read/write speeds as advertised), have a pretty good system, are getting long-term 100% disk usage, and none of the steps above do anything for you, there could be some drive-specific errors.
Note that if your disk usage is high, it’s likely not due to a dirty drive or some disk-level error that an inbuilt utility can fix. Still, if nothing else works, these are worth trying if you have the patience.
Defragmentation
Modern SSDs and even HDDs are pretty good at keeping themselves clean even after hundreds of thousands of operations. Still, you never know. Launch the Defragment and Optimize Drives program and check if any of the disks are showing fragmentation. If yes, defragment them and set up automatic defragmentation as well.
Dirty Drives
Open Start and type cmd then right-click > Run as Administrator (you can also use PowerShell) Here, type or paste the following command:
wmic diskdrive get status && fsutil dirty query c:If you see an “OK” in the status and that the volume is not dirty, then there’s nothing much to do here. But if you see problems here, you might need to get it replaced as these errors could be a result of a variety of things, and can’t always be fixed.
SFC
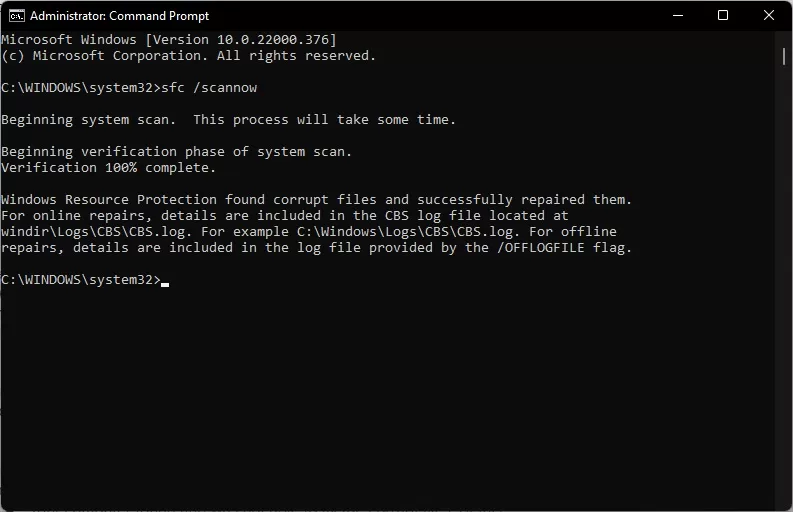
The SFC tool is a little more advanced. It’s really effective for many issues, such as if your disk is stuck in a reboot loop, but can’t help much in other cases. Still, it’s worth a try as some disk errors can be fixed cleanly and reliably by this tool. Launch CMD or PowerShell in Administrator mode and type or paste the following command:
sfc /scannow && DISM /Online /Cleanup-Image /RestoreHealth && sfc /scannowThis is a combination of two commands that will try to automatically restore the health of your disk and then do another scan to make sure everything is working properly. This can take a while even on SSDs, especially if you have a lot of files and programs. Once SFC is done, you will see an input pointer. Type exit and restart your PC.
Other Things to Try
A lot could go wrong with a PC. Bad sectors, faulty RAM, rogue background applications – you name it. If you can’t solve 100% disk usage using any of the tips above, then here are some additional things to try, only applicable to niche cases.
- Fast Startup: Windows has a Fast Boot mode that puts the PC into hibernation by putting all of the RAM’s stuff into your storage instead. This keeps the system from fully shutting down when you turn it off, allowing it to turn on faster the next time. This can create problems sometimes especially if you’re dual-booting, but it’s safe to try and turn it off to check if that’s the cause behind high disk usage. To turn it off, go to Control Panel > Power Options > Choose what the power buttons do > Change settings that are currently unavailable > uncheck the “Turn on fast startup (recommended)” option > Save changes. If you don’t see that option then it’s already turned off from the BIOS.
- DISM & CHKDSK: Much like SFC that we talked about earlier, there are two more utilities you can try. All of these utilities work differently, so there is a small possibility that if SFC couldn’t find or fix an error, one of these could. Open CMD or PowerShell with administrator permissions and type chkdsk. It will take some time. Next, DISM is pretty similar to SFC and the command is DISM /Online /Cleanup-Image /RestoreHealth (again, on an elevated CMD or PowerShell).
- Malware: Malware and viruses are really not that big of an issue in 2024 as long as you keep your system updated and don’t go to shady websites, but it’s possible that some kind of program has hidden itself in Task Manager while consuming resources in the background, showing up as legitimate Windows processes. This is a dangerous prospect, but one that’s easy to identify. Of course, do a virus scan first. Now, go to Task Manager and see the actual program that’s eating up the disk speed. If it’s malware or virus, it must be cloaked as a Windows service. Right-click on it and select “Open file location.” If this location is inside a folder like C:\Windows\System32, then it’s fine. But if it’s inside a shady folder that you can’t identify, you might want to Google the exact name and try to get to the bottom of it.
- Superfetch: You can disable Superfetch (now called SysMain) that’s kind of like an indexing or searching feature (not the actual Windows Search). It tries to determine which app you’re going to select, thus improving the experience. Try to disable this once (which is completely safe) and see if things improve. Open Run and type services.msc. Here, find Superfetch and right-click on it. Choose Properties and under Startup Type, choose Disable.
- Stop Antivirus: If you’re using a third-party antivirus software, you might want to disable it for a while and restart your PC. Simply exiting it from the taskbar might not be enough. Sometimes, background scans might be badly optimized, but you’ll know this from the Task Manager screen itself if it’s the antivirus program causing the trouble.
- Controllers & Drivers: The controllers that are responsible for facilitating the communication between the hardware and the software using the hardware might be at fault as well. Sadly, it’s not exactly easy or fast to fix them. Poor component quality or even wear and tear can cause damage to controllers. It’s also possible that there is a firmware error or a manufacturing defect. Though it’s probably not a controller failure, which is more of a disaster for your data than a speed issue for your PC, it might still help to check for common controller issues for your particular SSD or HDD. There might be some complaints and their solutions on forums. The same goes with drivers, though driver issues are rarer, with Windows being quite smart in setting up the majority of disks pretty reliably.
People have been able to fix this issue by updating to the latest Windows build and sometimes by leaving the PC on overnight to let it do whatever was so demanding for your disk. On the other hand, some have never been able to solve it without replacing their drives. Why your disk speed is being used up entirely is one of the more generic problems to solve, but if it’s not caused by a single program or some kind of other hardware’s fault, then it’s quite safe to assume that there might not be a way out here. Try all the steps above and if nothing works still – get in touch with us using the contact form with screenshots of HWiNFO, your Task Manager (full) sorted by disk usage, and the disk’s hardware information (Device Manager > Disk drives > open the disk in question > Events tab.