If you’re new in the world of overclocking, it’s okay to be a little afraid. After all, manufacturers openly tell you to not overclock if you don’t wish your card’s warranty to be voided. Well, the thing is, they can’t know even if you damage your GPU by overclocking. But that’s a whole other story. For now, we’re interested in safe, reliable, and tested overclocking that doesn’t need big brains.
The process is simple – you install MSI Afterburner (or another tool) and increase the clock speed and voltage in increments. After every small increment, you test your system for stability (basically wait to see if the PC crashes). If it’s stable, rinse and repeat. The moment you hit the point where your PC crashes like clockwork, you stop at the increment before that.
Sounds simple, and it is simple. Just keep these things in mind:
- Modern GPUs are meant to be overclocked, though not all the time. In fact, they overclock automatically even if you don’t use any third-party tool to meet the demand. This is within safe, manufacturer-determined limits, of course.
- The power draw of a GPU should only be increased if you’re sure that your power supply can afford that much power from the wall.
- The moment you close the overclocking app, the GPU winds down and it won’t overclock anymore. It’s not like you’re tinkering with anything inside the GPU. It’s all software-based.
- It helps to benchmark your GPU using a test like 3DMark or FurMark so you can compare your pre-overclock and post-overclock scores. In-game FPS can be a more practical guide.
- Always monitor the temperature, utilization, fan speed, current FPS, etc. when testing a particular overclock speed. Use HWiNFO for this.
- You can use other tools, such as AMD Software for AMD cards has a built-in overclocking utility, or something like EVGA Precision and ASUS GPU Tweak. I recommend sticking with MSI Afterburner.
The Process
With all that out of the way, let’s talk about actual process – the easiest way to overclock your graphics card. The guide below is not going to focus on the finer details. There are many ways to optimize your GPU, such as testing different values of voltage. But we’re going to take the shortest and easiest route here. You’re free to learn more about each component of the overclocking process separately.
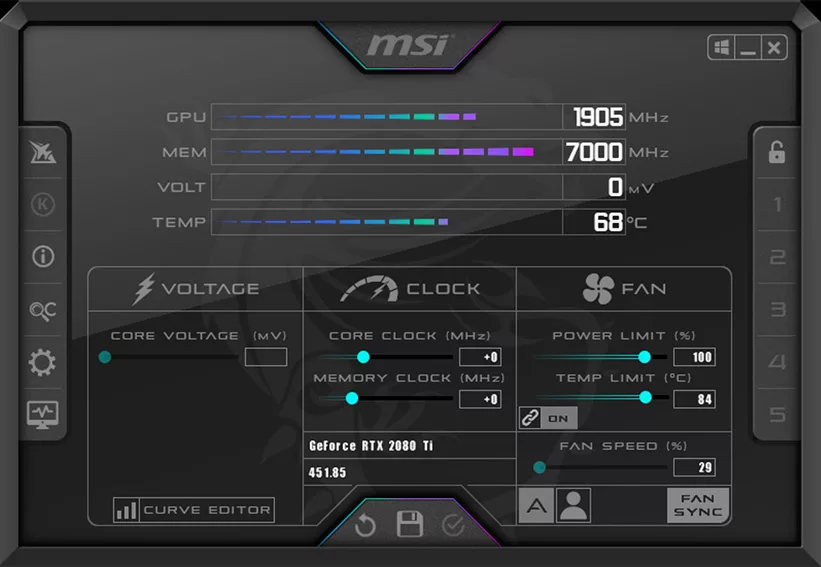
First of all, install and run MSI Afterburner and ensure there are no pending Windows updates.
- Max out the first three sliders – Core Voltage, Power Limit, and Temp. Limit, then click Apply. Wait 5 seconds. If your GPU fan is not exceptionally noisy, you can also set the fan speed to 100%. This will keep the fan spinning at its top speed all the time. It might help in some cases. Mostly, mechanical parts like fans are not really recommended to spin at full speed even when there’s no need (the GPU fans stay idle more or less until you start gaming).
- Now, there are two more sliders – Core Clock and Memory Clock. We’re going to skip the Memory Clock altogether to keep things simple. It’s a more nuanced thing, so unless you want to squeeze every ounce of performance from your GPU, I suggest you leave it there. Core Clock is what we’re mainly interested in. Add +50 to it and click Apply. Wait 3-4 seconds. If the PC remains responsive (and most importantly, on), everything is fine.
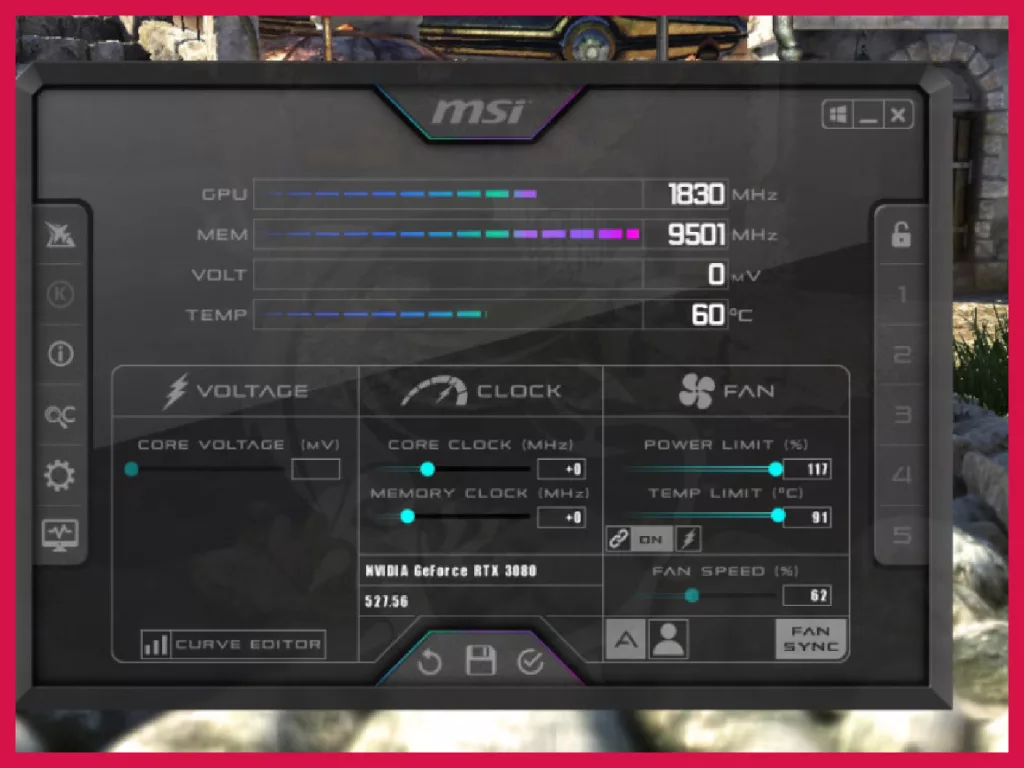
- Repeat Step 5 as many times as you can until you experience a crash.
- Let’s say your GPU is stable at +200 but crashes at +250. Now, it’s time to go back to +200 and do increments of +10 or +5 now, until you reach the exact number beyond which you can’t go any farther. Let’s say this number is +235. This is what your GPU model and particular silicon can be pushed to. Remember this number.
Voila, you’ve overclocked your GPU safely. Launch Afterburner whenever you want to overclock your card (like before gaming) and save the settings in a profile (there are 5 in Afterburner).
Parting Remarks
Now, this is not an exact science.
Sometimes, your PC might crash at +240, sometimes it might work fine when your Clock Speed is +250 and Memory Clock is also high. Sometimes, you might be able to go even higher as long as you keep the Core Voltage percentage low. It’s all a matter of tinkering. For the quickest way, however, the 4-step process above should be more than sufficient.
Do a few tests and that’s it. You can also Google for the common Clock Speed values for your GPU, but due to silicon lottery, GPU age, brand, and other factors, every GPU’s figures are slightly different.
One last thing – don’t be too worried about a PC crash. As long as you’re keeping background services to a minimum and not opening any other program during overclocking except perhaps something to monitor the temperatures like HWiNFO or Task Manager, it’s all good. The crash is the natural failsafe built into every GPU. It would rather power down and disconnect than melt, you see.
My old RX 580 used to run at a Core Clock speed of +100 and Memory Clock of +875. I had a beefy PSU for my PC at that time, and I had scaled the Power Limit to 107%. Right now I don’t overclock my new RX 6700 XT. The recent GPUs inside a case with good airflow are more than sufficient for any 1440p@60FPS needs that I’m hardlocked into.
Just for fun, I’m going to throw in the exact settings I used on Afterburner to run my 3-GPU wooden frame rig back when Ethereum mining was all the rage. It was essentially overclocked and undervolted, as the purpose wasn’t gaming but doing calculations. I was using three GTX 1660 Ti cards, and all had different OC settings to stay stable and gave me different performance in pure MH/s (silicon lottery). These were, on average, -500 Core Clock (yes, negative); +1080 Memory Clock; 58%/65°C Temp. Limit; and Fan Speed at a constant 60, which was loud enough in an open-rig with 3 GPUs (6 fans).